Ever felt disappointed when your porterhouse steak didn’t turn out as tender and juicy as you’d like? Here’s a piece of food science for you: the reverse sear technique might be your game-changer.
This blog will guide you step-by-step through this innovative method, enhancing the flavor and texture of your porterhouse steaks to restaurant-quality levels. Ready to become a home-grill master? Let’s dive in!
Key Takeaways
- The reverse sear technique is a method of cooking porterhouse steaks that involves slow roasting them in the oven before finishing with a high heat sear.
- This technique results in more even cooking, with a tender and juicy interior and a flavorful crust on the outside.
- The reverse sear method works best for thicker cuts of steak like porterhouse, allowing for perfect doneness throughout without overcooking.
What is the Reverse Sear Technique?
The reverse sear is a fun way to cook steak. You start in the oven at a low heat. This slow cooking makes sure all of the meat gets warm, but not too hot. It’s how you get a tender, juicy middle.
After that, you move the steak to a pan with high heat. Here, it cooks fast on the outside. The crust turns out crispy and full of flavor. This step gives your porterhouse steak its final touch! The reverse sear method works best for thick cuts like porterhouse steaks but it can be used for other types too.
https://www.youtube.com/watch?v=smTHGQFTtSY
Benefits of the Reverse Sear Technique for Porterhouse Steaks
The reverse sear technique has several benefits when it comes to cooking porterhouse steaks. One of the main advantages is that it allows for more even cooking. By starting with slow cooking in the oven, the steak cooks through gently and evenly, resulting in a tender and juicy interior.
This method also helps to develop a flavorful crust on the outside of the steak by searing it in a hot pan after baking. Additionally, using the reverse sear technique helps to prevent overcooking since you have better control over the doneness of your steak.
This means you can achieve that perfect medium-rare or desired level of doneness without worrying about drying out your meat.
Another benefit of using this technique is that it works well for thicker cuts of steak like porterhouse. Thicker cuts tend to be more challenging to cook evenly using traditional methods because they can easily end up burnt on the outside while still being undercooked on the inside.
The reverse sear method solves this problem by slowly roasting them in an oven first before finishing with a sear, ensuring that they are cooked perfectly throughout.
Lastly, another advantage is that you can experiment with different flavors and seasonings when using the reverse sear technique. Since you have more control over how long your steak cooks in the oven, you can add marinades or seasonings before baking to infuse extra flavor into your meat.
In summary, some benefits of using the reverse sear technique for porterhouse steaks include achieving even cooking with a tender and juicy interior, developing a flavorful crust on the outside, preventing overcooking and allowing for experimentation with different flavors and seasonings.
Step-by-Step Guide to Mastering the Reverse Sear Technique
To master the reverse sear technique, start by preheating your oven and seasoning the porterhouse steak. Then, roast it in the oven until it reaches your desired internal temperature.
Finally, sear the steak on high heat to achieve a beautiful crust. Want to know more? Keep reading!
https://www.youtube.com/watch?v=smTHGQFTtSY
Preparation and seasoning
Before you start reverse searing your porterhouse steak, it’s important to prepare and season it properly. Begin by preheating your oven to a low temperature, around 275°F. Season the steak generously with salt and pepper on all sides.
You can get creative with additional seasonings like garlic powder or herbs if desired. Place the seasoned steak on a baking rack set over a baking sheet to allow air circulation and prevent the meat from getting soggy.
This will also help promote even cooking throughout the entire steak. Once seasoned, pop the steak in the oven and let it slowly cook until it reaches an internal temperature of about 110°F for medium-rare doneness (use a thermometer for accuracy).
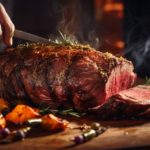
Oven roasting
Oven roasting is an important step in the reverse sear technique for cooking porterhouse steaks. After seasoning your steak, you place it on a rack in a preheated oven. The low temperature and slow cooking help ensure that the steak cooks evenly and reaches the desired doneness throughout.
By starting with oven roasting, you can achieve a nice medium-rare interior with a deliciously tender texture. It may take a bit longer than traditional methods, but it’s worth it for that perfect bite of juicy steak!
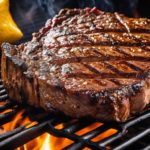
Searing on high heat
Now it’s time to give your porterhouse steak a nice sear on high heat. This step helps to develop that delicious crust on the outside of the meat while keeping the inside juicy and tender.
Heat up a skillet or grill pan over high heat until it gets really hot. You want to hear that sizzle when you place the steak in the pan. Let it cook for a couple of minutes on each side, flipping once, until you get a beautiful brown crust.
This will add even more flavor to your perfectly cooked porterhouse steak. Remember, searing is all about high heat and quick cooking!
Tips and Tricks for Perfectly Reverse Searing Porterhouse Steaks
Choose a high-quality porterhouse steak and let it rest at room temperature for about 30 minutes before cooking to ensure even cooking throughout. Resting the steak after cooking is also crucial, allowing the juices to redistribute and creating a more tender and flavorful bite.
Use a meat thermometer to monitor the internal temperature, aiming for medium-rare doneness at around 130°F (54°C).
Choosing the right cut
When it comes to reverse searing porterhouse steaks, choosing the right cut of meat is key. The porterhouse steak is perfect for this technique because it has two cuts in one – a tenderloin on one side and a New York strip on the other.
This means you get the best of both worlds – a melt-in-your-mouth tender texture and rich, beefy flavor. Look for porterhouse steaks that are thick-cut, about 1-1 ½ inches, as thinner cuts may not cook evenly with the reverse sear method.
So, when you’re at the grocery store or butcher shop, keep an eye out for those beautiful porterhouse steaks with a generous thickness to ensure a perfectly cooked result.
Resting the steak
Resting the steak is an essential step after reverse searing. Once you’ve seared the steak, it’s tempting to cut into it right away, but patience is key. Letting the steak rest for a few minutes allows the juices to redistribute throughout the meat, making it juicier and more flavorful.
Simply transfer the cooked steak to a cutting board or plate and cover it loosely with foil. Give it about 5-10 minutes to rest before slicing into it. This short wait will be well worth it when you taste how tender and delicious your porterhouse steak turns out.
Using a thermometer
To ensure that your porterhouse steak is cooked to perfection, it’s important to use a thermometer. A thermometer will help you determine the doneness of your steak accurately. Insert the thermometer into the thickest part of the meat, avoiding any bones or fat.
For medium-rare, look for a temperature of around 135°F (57°C). Remember to remove the steak from heat when it’s a few degrees below your desired doneness as it will continue cooking while resting.
Using a thermometer takes out all the guesswork and helps you achieve that juicy and tender porterhouse steak every time.
Pairing Recommendations and Conclusion
In conclusion, mastering the reverse sear technique for porterhouse steaks can elevate your steak-cooking game to a whole new level. By slow cooking in the oven and then searing on high heat, you can achieve a perfectly cooked medium-rare steak with a deliciously crispy crust.
So grab your favorite cut of porterhouse steak, follow our step-by-step guide, and get ready to impress your friends and family with tender and juicy steaks every time!
FAQs
Q: What is the reverse sear technique for cooking porterhouse steaks?
A: The reverse sear technique is a method of cooking steaks where you first slow-cook the steak on a grill or in an oven at a low temperature until it reaches your desired internal temperature, and then finish it off with a quick sear on a hot grill or in a cast iron skillet. This method ensures that the steak is evenly cooked and results in a flavorful and tender steak.
Q: How does the reverse sear method work?
A: The reverse sear method works by slowly cooking the steak at a low temperature, allowing the steak to evenly cook and develop a nice crust. By starting with low heat, you can control the cooking process and achieve a perfectly cooked steak with a consistent internal temperature.
Q: What are the benefits of using the reverse sear technique?
A: The reverse sear technique offers several benefits. First, it allows you to cook the steak to your desired level of doneness without overcooking it. Second, it allows the steak to retain more of its natural juices, resulting in a juicier and more flavorful steak. Finally, the reverse sear method creates a beautiful crust on the steak, adding extra texture and flavor.
Q: What type of steak is best for reverse searing?
A: The reverse sear method can be used with various cuts of steak, but it is particularly well-suited for thick cuts like porterhouse steaks. These thicker cuts require a longer cooking time, and the reverse sear technique allows for more precise control over the cooking process.
Q: Do I need to season the steak before reverse searing?
A: Yes, it is recommended to season the steak before reverse searing. You can use your favorite steak seasoning or simply season the steak with salt and pepper. The seasoning will enhance the flavor of the steak during the cooking process.
Q: How do I reverse sear a steak on a grill?
A: To reverse sear a steak on a grill, start by preheating the grill to a low temperature (around 225°F). Place the seasoned steak on the grill and cook it slowly until it reaches the desired internal temperature. Once the steak is cooked to temperature, remove it from the grill and let it rest for a few minutes. Then, sear the steak on a hot grill for a couple of minutes on each side to create a nice crust.
Q: Can I reverse sear a steak in a cast iron skillet?
A: Yes, you can also reverse sear a steak in a cast iron skillet. Start by preheating the skillet over low heat. Place the seasoned steak in the skillet and cook it slowly, flipping it occasionally, until it reaches the desired internal temperature. Once the steak is cooked to temperature, remove it from the skillet and let it rest. Then, heat the skillet over high heat and sear the steak for a minute or two on each side to achieve a nice crust.
Q: How long does it take to reverse sear a steak?
A: The cooking time for reverse searing a steak depends on the thickness of the steak and the desired level of doneness. As a general guideline, it can take anywhere from 45 minutes to 1 hour to reverse sear a 1-inch thick steak. However, it is recommended to use an instant-read thermometer to monitor the steak’s internal temperature to ensure it is cooked to your preference.
Q: What internal temperature should I cook the steak to when reverse searing?
A: The internal temperature for cooking a steak will vary depending on your preferred level of doneness. For a medium-rare steak, the internal temperature should be around 135°F, while a medium steak should be cooked to an internal temperature of 145°F. It is recommended to use an instant-read thermometer to check the steak’s internal temperature and avoid overcooking.
Q: Can I reverse sear a T-bone steak?
A: Yes, you can reverse sear a T-bone steak using the same method as other steaks. However, since T-bone steaks typically have a combination of tenderloin and strip steak, you may need to adjust the cooking time to ensure both sections of the steak are cooked to your liking.
Greetings!
With over two decades of diverse experience in the meat industry, I proudly stand as an expert in all things meat. My journey commenced with a strong foundation in hospitality, where I honed my culinary skills as a chef in prestigious restaurants and on luxurious superyachts worldwide.
However, my true passion lies in the art of butchery. Throughout my extensive career, I have had the privilege of working with renowned meat purveyors and mastering the craft of meat cutting and preparation. From breaking down whole carcasses to meticulously selecting prime cuts, my butchery expertise is at the core of my meat knowledge.
Having immersed myself in various cultures and cuisines, I have honed my skills to deliver exceptional dining experiences, crafting delectable dishes that celebrate the natural flavors of different meats. Whether it's sourcing the finest meats for discerning clients or sharing valuable tips on meat selection and cooking, I take pride in elevating the meat experience for both professionals and enthusiasts.
My journey has taken me from the bustling kitchens of top-rated restaurants to the heart of meat processing facilities, gaining insights and honing my skills to become a true meat connoisseur. Now, I am enthusiastic about sharing my expertise, offering valuable insights on meat selection, cooking techniques, and the art of butchery.